EE 209AS Winter 2018 Project Report
Topic: Car Passive Keyless Entry System Relay Attack
Team: Hui Wang, Wenxuan Mao, Yifan Zhang
This is the final analysis report for this project
The proposal can be viewed at:
The midterm report can be viewed at:
I. Introduction
Embedded systems are largely used in many modern technologies and are commonly found in automobiles. While they bring us great convenience, their potential security issue has also been one of the major concerns of people.
PKE (Passive Keyless Entry) system allows the driver to unlock cars without taking out their key fob. Drivers can easily open the doors by just being in the proximity of the vehicle or by touching the door handle. Most cars’ PKE systems use RFID as the near field communication from car to the key. This system uses both low frequency and high frequency radio signals to complete the two-way authentication between car door and the key fob. First, the car emits a 125kHz signal when someone is trying to open the door. If the car key is within the range of 125kHz signal, the key will respond a high frequency signal corresponding to the challenge included in the 125kHz signal received. Then if the car received the correct signal from the key, the door will be opened. The same mechanism can apply to start the engine.
There are two vulnerabilities that can be made use of: 1) The car used the close range property of the low frequency signal as the only guarantee of the proximity detection. 2) The key responded with a signal in high frequency which can transmit over 50m when there is no obstacles between.
We looked into the specific ECU (Electronic Control Unit) of high end vehicles’ passive keyless entry system and found an interesting relay attack specific to this system. The above two vulnerabilities PKE systems make the relay attack possible. We are repeating this relay attack to more modern models of cars using a Software Defined Radio(SDR) which is easier to implement than the research done before to see if the problem still exists. To be specific, the idea of trying to hack the cars’ keyless entry system was inspired by the a presentation named Attack Passive Keyless Entry System Using HACKKEY by Unicorn Team on BlackHat USA in 2017.
The objective in this project is to detect and collect the 125kHz signal emitted by the car using SDR and then we send the signal to another SDR that near the car’s key via WiFi. After the key received the signal, it will respond with a high frequency signal which we don’t need to relay if the car key is within 50 meters from the car.
The structure for this report is organized as below. In section II, we talked about two prior research done analyzing the same security issue. In section III, we introduced our tool which is a Proxmark3 RFID SDR. The setup for the SDR was also talked about. In section IV, we provided our approach and technical rationale on the procedure of our hacking. In section V, a real world hacking setup was shown visually. In the last section VI, we discussed the outcome and analysis into the experiment.
II. Literature Review
There are mainly two prior literatures most closely related to our topic, relay attack on passive keyless entry system. One is from ETH Zurich which is named Relay Attacks on Passive Keyless Entry and Start Systems in Modern Cars[2]. The second one is a powerpoint from Qihoo 360 unicorn team from the 2017 Blackhat conference, which is named Car keyless entry system attack[1].
The ETH’s paper demonstrated the relay attacks on PKE systems in modern cars. A PKE system smart key consists of an short range (1-2 m or a few centimeters) LF RFID tag and a long range (10-100 m) UHF transceiver. The LF channel is used to detect if the key fob is near the car. When the key detects the signal from car, it wakes up the microcontroller, demodulates, interprets the signal, and then replied on the UHF channel with a computed response, which is received and verified by the car. The main reason to make the relay attacks possible is that PKE systems assumes that the ability to communicate between car and key implies physical proximity. However the physical distance can be manipulated by malicious attackers. The authors implemented wired physical-layer relay attack that composed of two loop antennas connected together with a cable, and wireless relay attack that utilized a purpose-built RF link with minimal delays. And their experiment result indicated that for a 30m tested distance, the delays of wired relay attack and wireless attack are 350(±20) ns and 120(±20) ns, respectively. They evaluated on 10 more car models from 8 manufacturers, all of which were successfully attacked. Their result showed that relaying the signal in one direction only (from the car to the key) is sufficient to complete the relay attack. They used USRP1 to measure the maximum acceptable delay on vehicles, and among the 10 car models they tested on, the maximum acceptable delays are from 35us to 20ms. They further investigated such PKE systems and found out that it is likely that all PKE systems based on similar designs are vulnerable to relay attacks. The ETH’s paper gives us a strong theory background about the car’s keyless entry system and gave us theoretical support of the possibility of the relay attack.
The Qihoo’s project built a pair of their own custom devices. Their gadgets include chips to demodulate the signal and unpack the signal into ones and zeros instead of just copying the raw radio signal and sending it whole. In this way they can send the decomposed signal bit by bit using less energy and at a much lower frequency, which indicates a longer range (1000 feet). The components they used include CC1101 (Low-Power Sub-1GHz RF Transceiver), EM4095 (125KHz-134KHz, Read/Write analog front end for RFID basestation), as3933 (Programmable 3D LF wake-up receiver), ATmega3280p (8-bit AVR microcontroller), antennas, PCB board and batteries. They have successfully conducted two relay attacks at ranges of 320m and 200m. Their work has not only demonstrated the relay attack again but also made it cheaper and easier than ever, with a cost of just 22 USD building two gadgets. While the cost of ETH group’s relay setups is 100-1000 USD. And their work also gave us some detail about the relay timing constraint in order to successfully fool the PKE system. Their presentation can be viewed at link: https://conference.hitb.org/hitbsecconf2017ams/sessions/chasing-cars-keyless-entry-system-attacks/.
III. Tool Overview and Setup
- Tool Overview
The main tool used in our attack is two Proxmark3, which are Software Defined Radios that is designed specifically for the RFID frequencies. The Proxmark3 is a general purpose RFID tool which target at 125kHz (Low Frequency) to 13.56MHz (High Frequency). It is a completely open source tool and the Github repository can be found in the link: https://github.com/Proxmark/proxmark3. The SDR tool consist of an ARM CPU and a Xilinx Spartan-II FPGA. Two separate antenna port for low frequency and high frequency operations are presented on board so that the tool will support the multi-frequency operation. While in our application, only the low frequency was used. The SDR can be completely powered by USB and interface using serial communication or it can also be set to standalone mode which used battery as the power source.
As we further explored the tool we found that most of modulation and demodulation tasks as well as controlling the antenna is done using the FPGA and the CPU is just responsible for sending commands to the FPGA and communicate with the serial interface. However, some of the advanced functions such as coding/decoding the tag frame are also implemented in the CPU which we did not use in the project.
- Tool Setup
The tool is compatible with most of the common operating system. In our case, we used Microsoft Windows 10 as our platform to interfacing with the Proxmark3. The Windows 10 OS will detect the Proxmark3 as a serial device once plug in and the tool is ready to use. The client software is available for download in the same github page. Because we need to modify the firmware of the tool so we downloaded the full development package which includes the compiler, flasher and the client.
The first step is to upgrade the firmware using the flasher provided. Then we familiarize with the tool by using the client to test on the different commands on the RFID cards. The command reference can be found in the link: https://github.com/Proxmark/proxmark3/wiki/commands. The firmware contains two parts: one is written in C for the CPU and another one is written in Verilog for the FPGA as stated before. The compiler need to run completely after any part of the code has been modified to generate .elf binary file to be uploaded onto the board.
- Example Command
After the tool is fully setup, it can use USB serial port to communicate to the client software (as shown in Fig. 1) in the Windows 10 system.
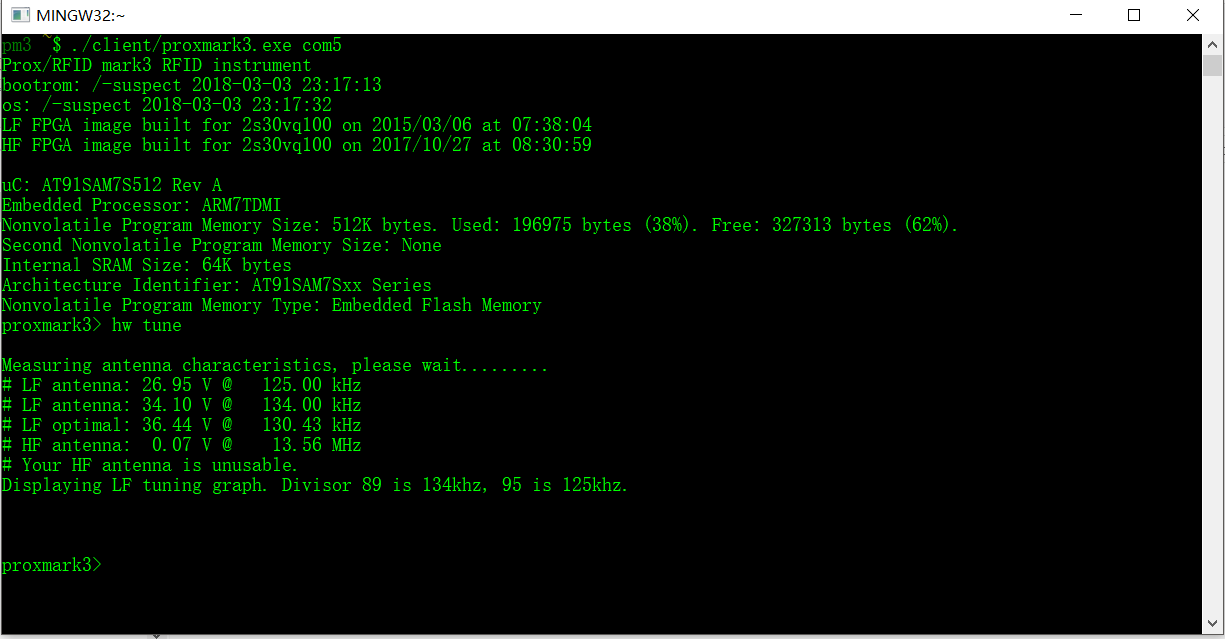 Figure 1. Client Software
The main commands we used are summarized below:
| Command | Description |
|---|---|
| lf config L t 8 | Low Frequency Configuration: -L: 125kHz -t :threshold |
| lf snoop | Capture the Low Frequency signal that exceeds the threshold and save the trace into the graph window |
| data samples 1800 | Get 1800 data samples |
| data save C:/… | Save the trace data to file |
| data load C:/… | Load the graph window from file |
| lf sim | Simulate the low frequency signal stored in the graph window |
| exit | Exit the client |
This is the part of the commands that used in the final demonstration. The commands such as demodulation and the modifications we made on the original commands are not shown in the table above for simplicity.
- File Transfer Network
In our application, a fast network used to transfer the signal trace file to another SDR is needed. Since our Proxmark3s are all powered and controller by Windows 10 machines. We can just simplified the problem into setting up the connections between two Windows 10 machines.
We compared different network options including Bluetooth, WiFi and Ethernet Cable. After carefully comparison, we found out Bluetooth is not stable and took more time in the authentication stage and tend to be extremely unstable when there are obstacles presented or the distance is too far. We finally decided on using the WiFi which is fast and convenient compared to the other two options. We are using two recently updated Windows 10 system so that the peer-to-peer network option need to be set up via WiFi Direct. We used the hotspot mode which embedded in the system settings of the Windows 10 and connect the two host computers. Then we used network shared folder to realize the file transfer between the two computers.
- Other Tools
We have used an additional 125kHz RFID card reader in our experiment. The function of the reader is to trigger the “lf sim” command to send the signal. “lf sim” command is simulating a passive tag which will only transmit signal when the external reader fields presented.
IV. Theoretical Attack Setup
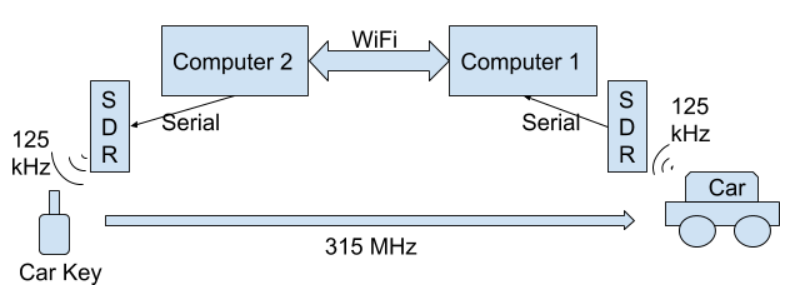
Figure. 2 Attack Setup Diagram
As figure 2 shown, we will have two SDRs and two computers to mimic the communication between the car to the car key. In the real world setting, when the open door command is triggered, the car will send a signal via 125kHz which is a signal only range 1-2 meters. Our goal here is to replay the same 125kHz signal to the car key located outside the car signal’s range. Since the car key uses 315MHz signal (long range communication) to respond back to the car, we don’t need to necessarily replay the car key signal as long as the car key is within 50 meters from the car.
We first set up the SDR to search for a 125 kHz signal constantly, and the SDR will be placed near the car. When someone pull the car door handle, the car will emit the 125kHz signal and wait for respond. After the SDR collected the signal, it will convert the signal in the graph windows to text file and save the text file in the shared folder. At the same time, the computer 2 which is connected to computer 1 via WiFi will continuously searching for the data file to appear in the shared folder. As soon as the computer 2 detected the file, it will give the load the file onto the SDR and the SDR will simulate and replay the same signal to the car key.
V. Realistic Attack Setup
- SDR Setup
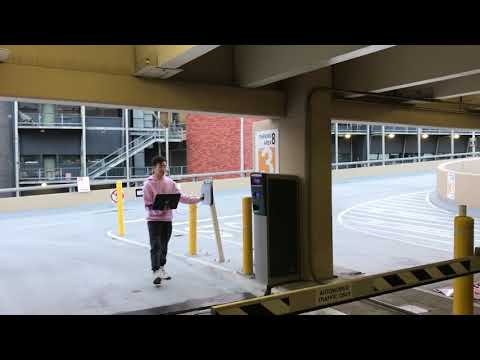
Generally, the antenna for transmitting the 125kHz from the car is located at the door handle and the signal will be transmitted when the handle is pulled or grasped. In order to maximize the quality of the 125kHz signal from the car, we place the Proxmark3 SDR right near the door handle as shown in the figure. Although the attack was being done in a relatively noise free underground parking lot, we tried different thresholds for the best performance. We found using of threshold of 5 can avoid detecting the noise from the real signal, however, in an open public the parking, the threshold need to be larger than 8. We are sampling the signal using 8 bit per sample so that the captured value could range from -128 to 127. The threshold is being used according to this scale.
 Figure. 3 Attempt to unlock door with Proxmark capturing signal
For maximizing the processing speed, we wrote two simple Windows scripts to make the SDR automatically save the detected signal to file and automatically load the received file to replay. The running result of the scripts are shown as below:
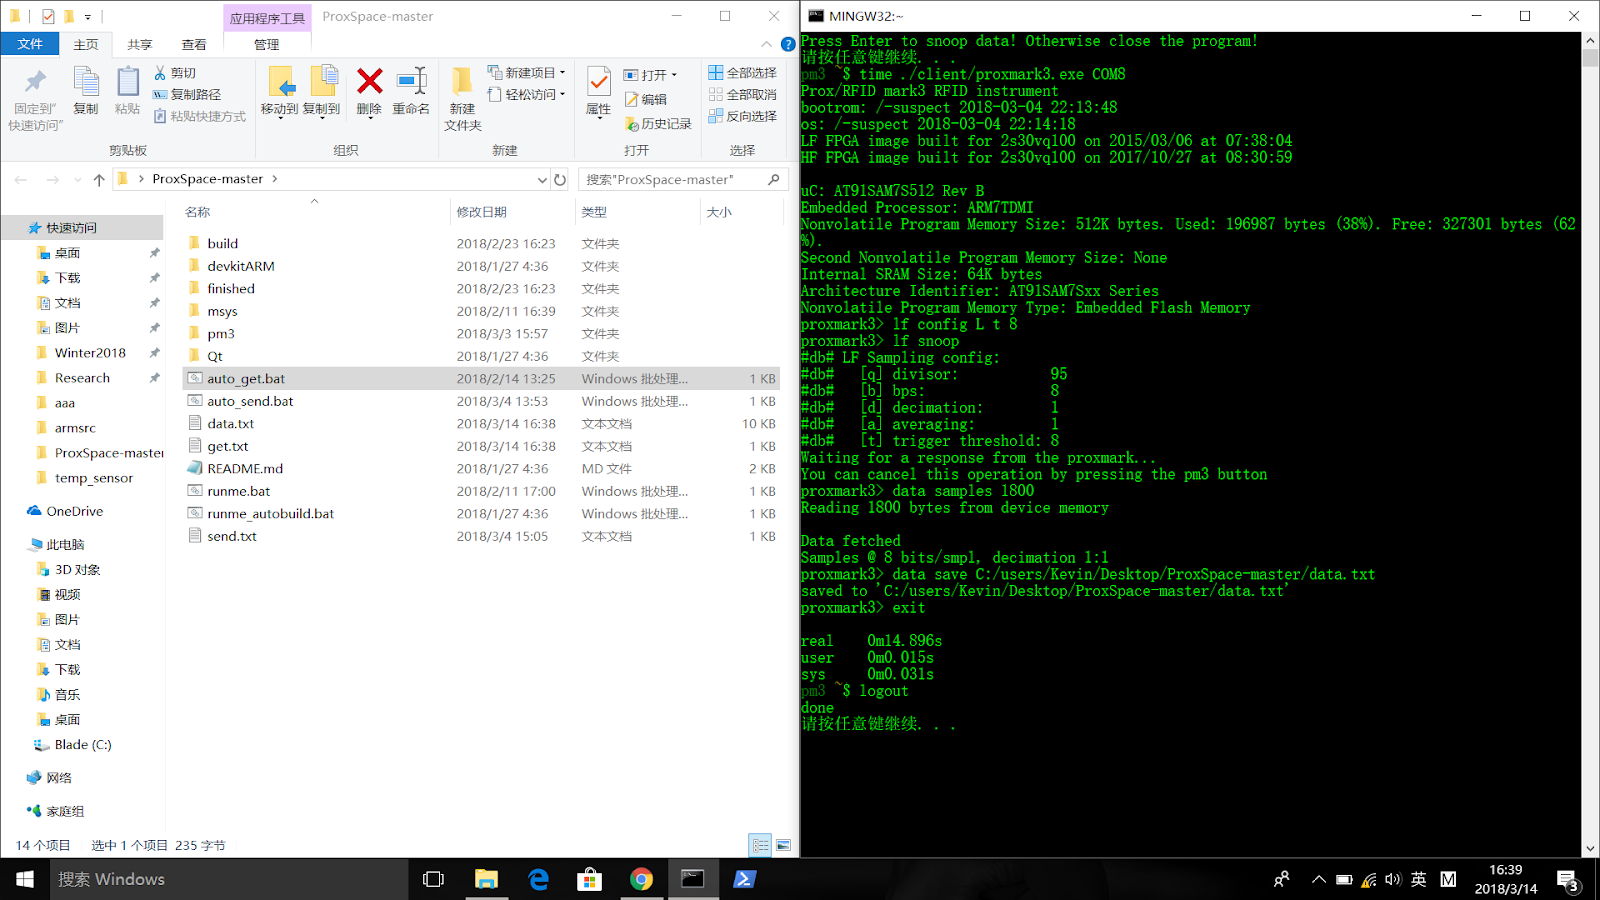 Figure 4. Auto Detect Signal from the car and save it to the file
In this script, we first open the client for SDR and set the serial port for communication. Then we sent four SDR commands: Set the mode to “low frequency” and a threshold of 8, Snoop for signal that is not noise, Get 1800 samples of signal, Save the trace to the designated path.
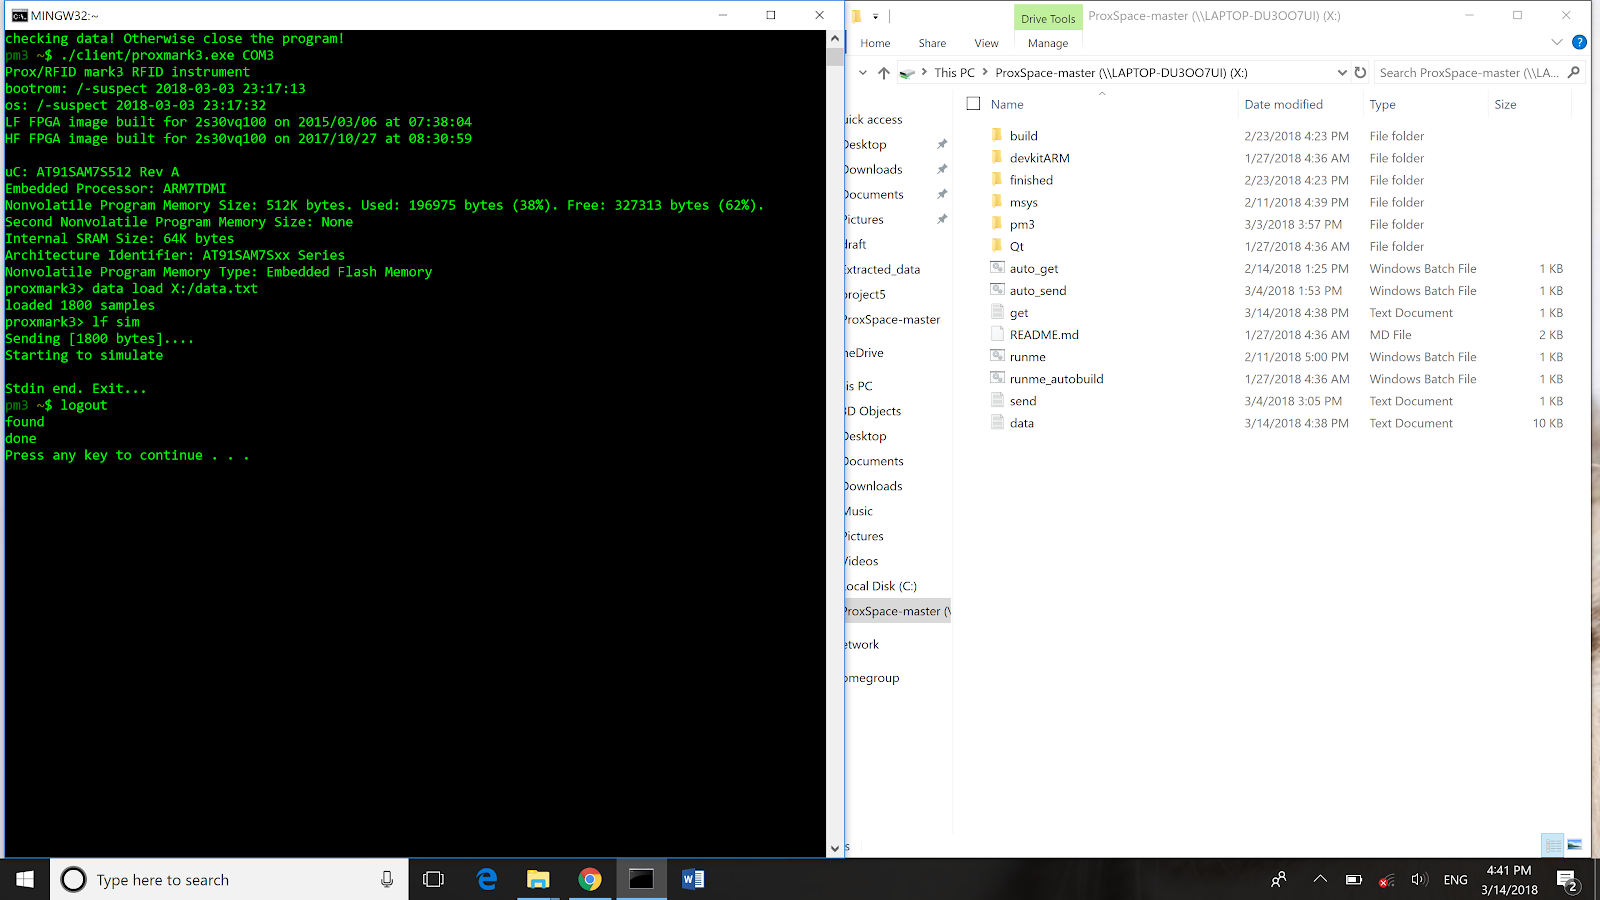 Figure 5. Auto Send Signal to the car key when file is available
In this script, we wrote a while loop to constantly check if the file exist in the designated file save path mentioned above. Then we again open the client for SDR and set the serial port for communication. Then we sent two SDR commands: Load the file from the designated path to the SDR, Simulate the loaded file.
There is a external reader field provided to the SDR when replay the signal to the car key as shown in figure 6. The reason is the SDR is only support simulating a passive tag which means it only replays the signal when a reader field presents. The reader field shown here is just a simple pulse followed by DC non-zero signal so that it will not interfere with the replay signal.
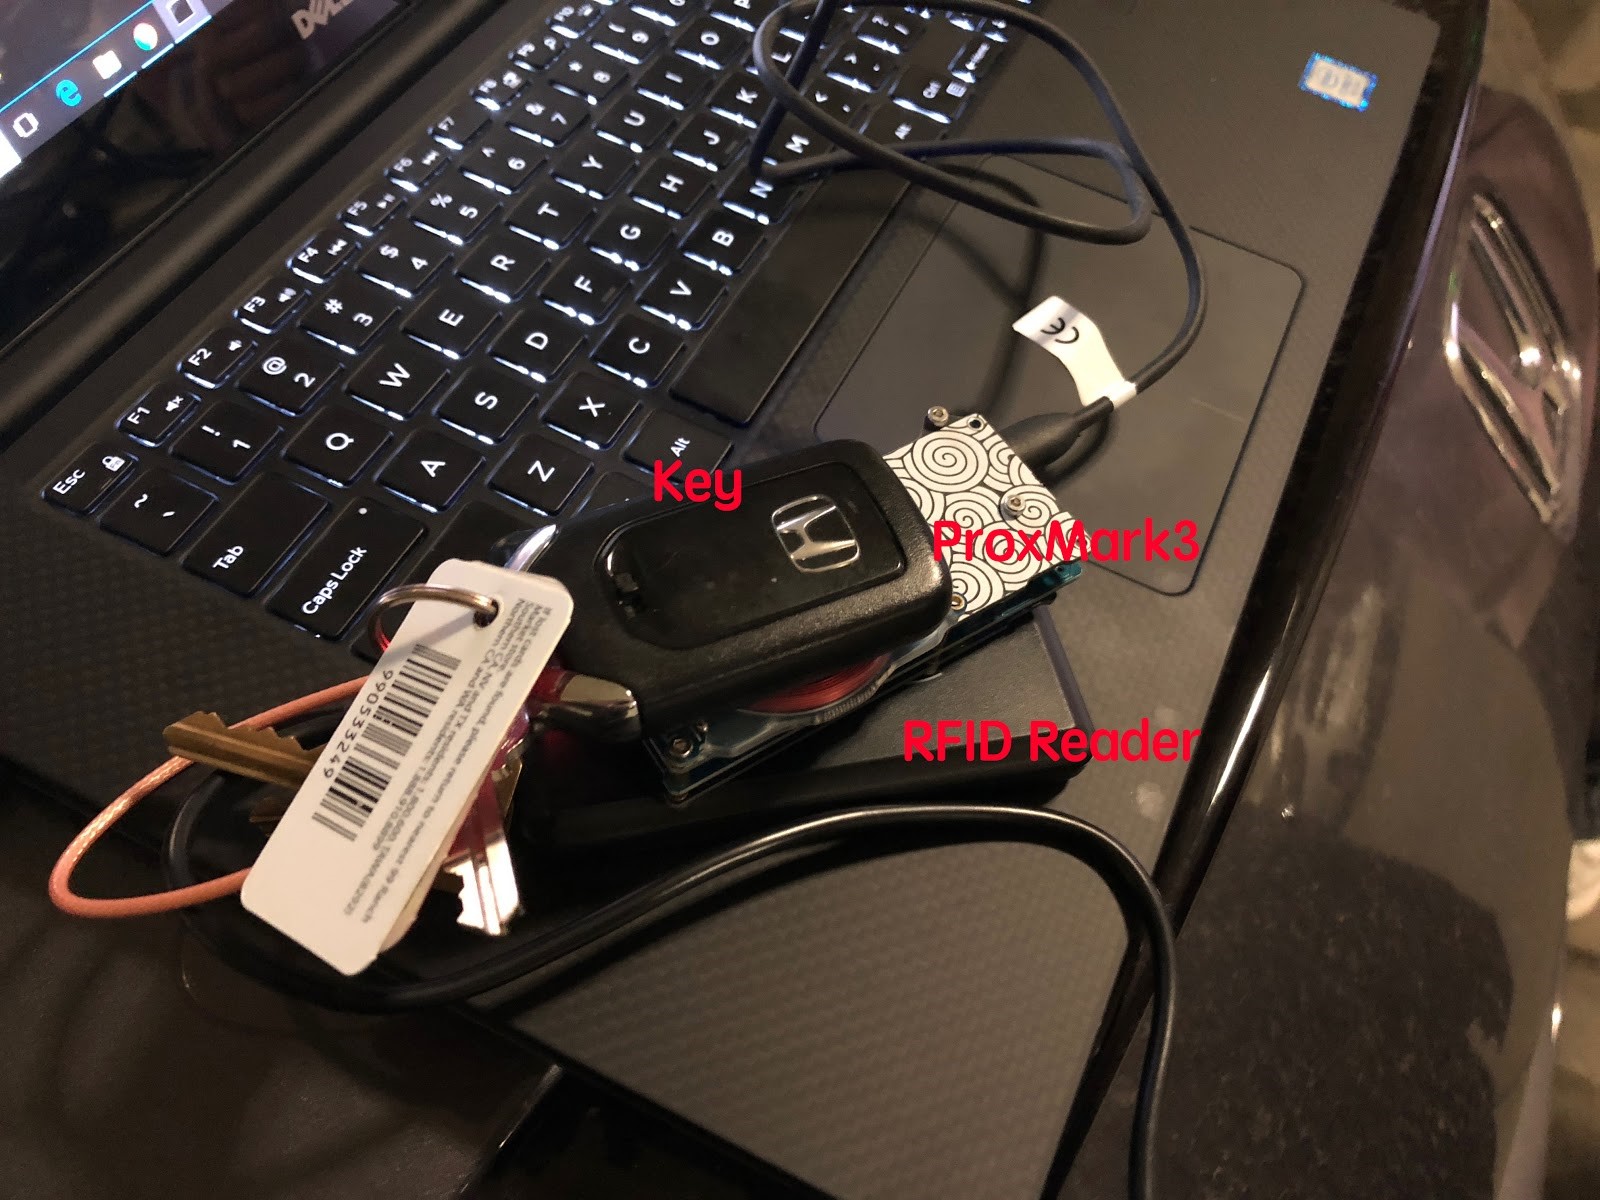 Figure 6. Key side RFID relay
- WiFi Network
We setup the WiFi Direct network using the embedded hotspot function available in Windows 10, which allows the other computer to join the network. Then we shared one folder in the network so that the folder can be accessed by any other computers connected in the network. The detected signal file will be saved to and loaded from this shared folder.
- Attack Procedure
Firstly, we connected the two host computers to the same network (the Hotspot network). Then, we executed the script for replay the signal so that it constantly check the saved file. Lastly, we executed the script for capture the signal from the car so that it constantly check for the non-noise signal. When we pull or grasp the door handle, the corresponding car ECU will be activated and send the signal. We can see the saved file in the shared folder and the SDR near the car key is replay the signal. An example trace file named data.txt is uploaded to Github repository for demonstration. The trace from Toyota is shown in Fig.7 below.
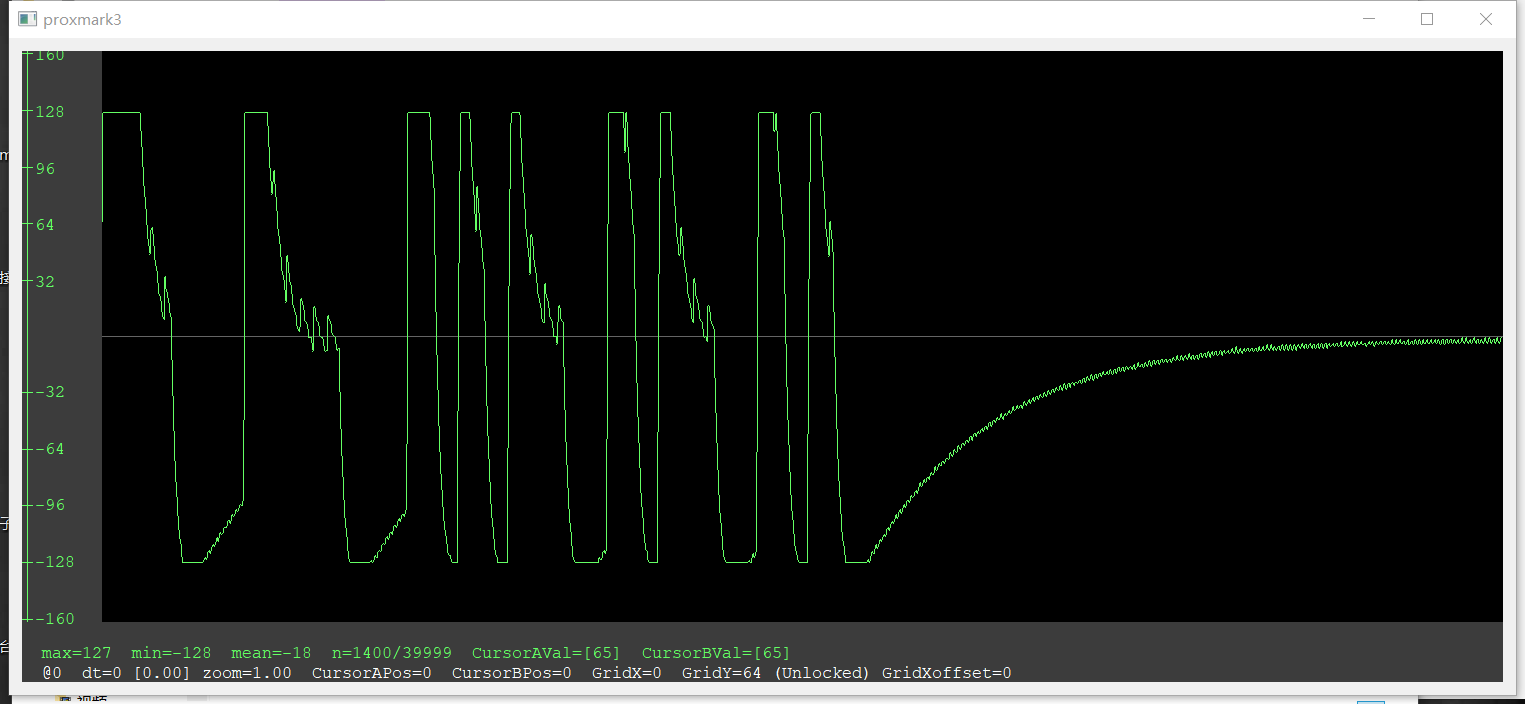 Figure 7. Signal Trace from collected from Toyota
VI. Results and Analysis
- Results
We attacked three models of car: a 2017 Toyota Avalon, a 2017 Honda Civic, a 2011 BMW 535i.
For the Toyota and Honda we attacked, we successfully retrieved the signal trace from the car and the replayed the same signal to the car key. However, the outcome of the replay attack is not successful, the car did not unlock as expected. Even surprisingly, the BMW attack failed at the signal collecting state. Using the same method, we tried using the SDR to collect the signal sent from the car. However, only noise is presented for the entire bandwidth of our tool, which is range from 125kHz-13.56MHz.
A video can be accessed here:

- Analysis
For the Toyota and Honda attack, we suspect the main reason we cannot successfully hack the car passive keyless entry system is the strict timing constraint presented in the nowadays cars. As stated above, the two cars are all very new models so that it is reasonable that the car manufacturer implemented more strict timing constraints to these systems after they saw the security issue. Another possible hypothesis is the car enabled two-way authentication similar to the RFID card/fob, which means the car key will also respond using 125kHz short range signal to authenticate with the car. However, we believe it is less possible since the car key have already built in an ultra high frequency radio to transmit the signal. Using an extra low frequency response system would increase the size and the cost of the key. Also, the low frequency transmitting system need higher power.
We analyzed into the replay script we wrote to see how much time it took from load the data to simulate the data using the built in time function of MINGW system, which the client software based on. As shown in figures below, the total time took from opening the client to simulating the signal is measured to be 720ms. The time taken to setting up and close the client software is 595ms. As a result, the total time taken to load the data and simulating the signal is 125ms. In the prior reading, we found that the car’s timing constraints can vary from microsecond to 30 milliseconds. While our 125 milliseconds delay is way too long for car to detect as authenticated signal.
If we assume the file transfer between two computers take no time, then the most delay happened in the opening the client and start simulating commands. However, these steps are necessary for a SDR to function properly, which means we cannot reduce the time taken due to the hardware constraints. This also explains a prior question that why most of the previous researches on PKES system were using hardware tool instead of using the convenient software defined radios. The timing limitation may be the priority concern for the researches before. Our attack here further explains that the commercially available SDRs do not meet the timing requirements for such relay attacks (at least for the three types of cars we tested on).
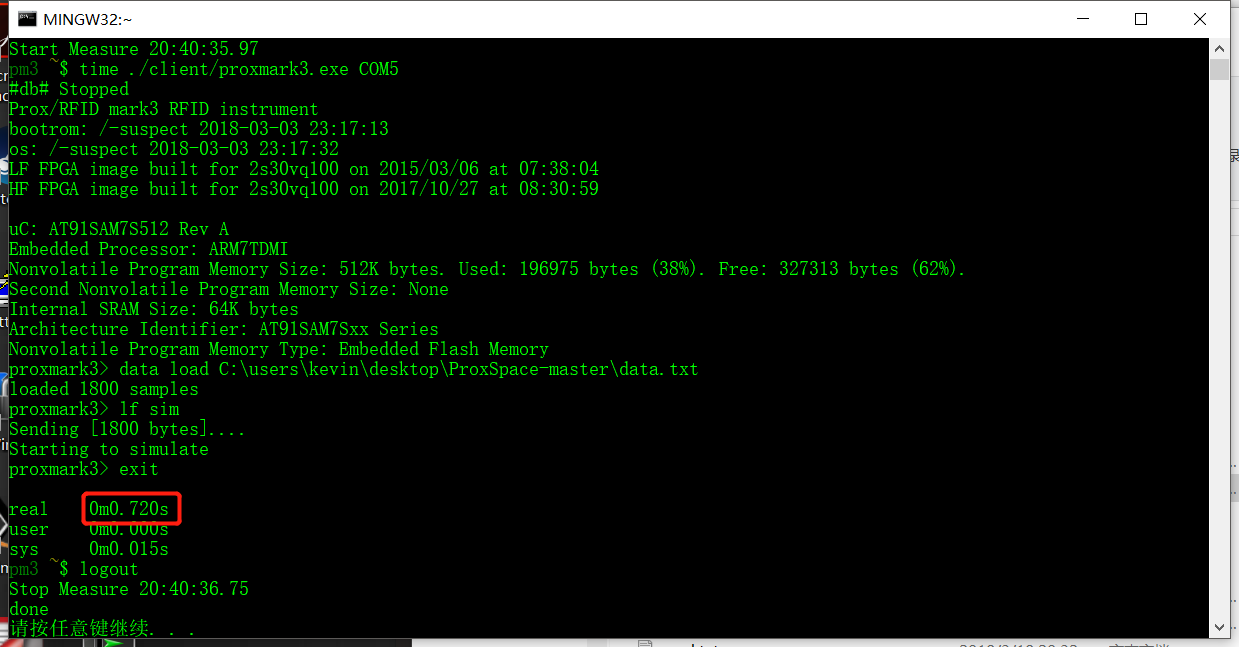 Figure 8. Time Measurement for Replay
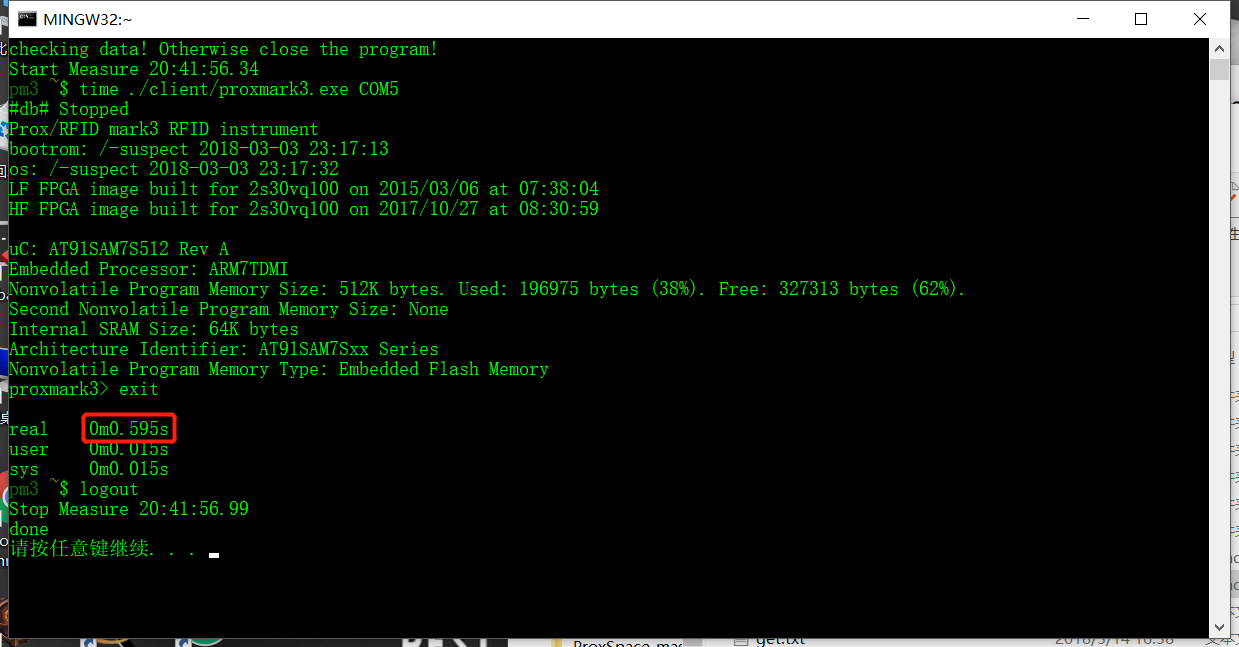 Figure 9. Time Measurement for Setting up the client
- Future Direction
We only tested our setup on three models of cars due to the limitations on availability of the cars. More model could be tested on to prove that the current system now can defend against these kinds of attack. Moreover, we did not prove that nowadays cars have stricter timing constraints than older cars because of our hardware limitation. By using a hardware approaches such as using carrier waves and modulation techniques to replay the original signal or even by using a more advanced SDR such as USRP series, the timing constraints existed may not protect the cars sufficiently. So that further researches using more advanced hardware need to done to verify the timing constraints.
Another issue is that we found out the BMW do not communicate with the car key using the same frequency as other models we tested. BMW can even uses different mechanism on their passive keyless entry system, which is very interesting to further research on the BMW models. An interesting fact is the prior researchers have proven their approach succeeded on an older BMW 7 series models. That means the BMW have updated their PKES system recently, but we do not know if the update is aimed at enhancing the security.
VII. Related Attacks
Since the Proxmark3 SDR is specialized on RFID tag related fields, we also did some interesting attacks on RFID tags. We did a successful attack by cloning the HID tag used to access to the parking structure in UCLA. The tool used here is only one Proxmark3 SDR. The commands we used for this attack is “lf search”, which will search for a known RFID tag and save the detected signal (from the HID tag) to the memory of the device. Then using the same commands we used to replay the car signal, we used “lf sim” to simulate the tag using the SDR. Using the SDR simulated tag, we successfully opened the gate for the parking structure.
By this attack, we could tell that the HID tag used for accessing the parking structure used static information, which means it do not have a challenge-response mechanism enabled to enhance the security. Anyone have physical access to the parking card can copy the information stored in the card and use it to enter the parking structure. Another finding is that the RFID reader for the parking structure on UCLA is always on, so that even I walked into the gate using the SDR simulated tag, the gate will open for me. That will potentially cause some energy waste and also have some other potential security issues.
A demo video can be viewed at:
VIII. Conclusion
In this report, we tried to attack the car’s passive keyless entry system using the software defined radio. The attack did not work out as expected due to the limitation of the hardware. In order to gain millisecond level or even microsecond delay, more powerful software defined radio or pure hardware tools need to used for performance. However, our attack into the cars did prove that the car manufacturers have enforced the timing constraints and some even implemented different mechanisms to realize the system.
IX. Reference
[1] Chaoran Wang, Jun Li, Qing Yang, Yingtao Zeng, Yunding Jian.(2017). Attack Passive Keyless Entry System using HACKKEY.. Retrieved from Blackhat 2017 at https://www.blackhat.com/us-17/arsenal/schedule/#attack-passive-keyless-entry-system-using-hackkey-7941. Their Powerpoint can be viewed at https://conference.hitb.org/hitbsecconf2017ams/materials/D2T2%20-%20Yingtao%20Zeng,%20Qing%20Yang%20and%20Jun%20Li%20-%20Car%20Keyless%20Entry%20System%20Attacks.pdf
[2] Francillon, Aurélien & Danev, Boris & Capkun, Srdjan. (2011). Relay Attacks on Passive Keyless Entry and Start Systems in Modern Cars..